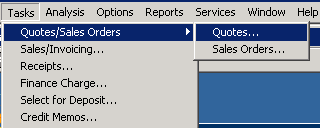
Overview:
 First you will click on receipts option from Task option
on tool bar.
First you will click on receipts option from Task option
on tool bar.


 Here
you will select cash account or bank account some times company has different
two banks accounts so in this option you will change account.
Here
you will select cash account or bank account some times company has different
two banks accounts so in this option you will change account.

 Apply
to sale invoice:
Apply
to sale invoice:

Receipts is generally prepared when cash is received
against sales this tab allow you different option which discuss below step wise
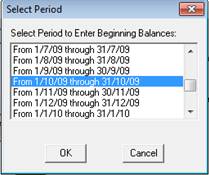
Step
1:
 First you will click on receipts option from Task option
on tool bar.
First you will click on receipts option from Task option
on tool bar.
Step
2:
A
receipts window will appear which has different tabs such as cash tab, customer
information tab, Apply to sale revenues and apply to invoice.

Customer
information:

In
this section you will write information related to your customer. Deposit Ticket ID here you will type ID
ticket which you save in your accounts.
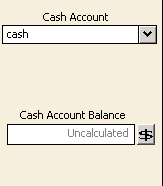
Cash
account:
Here
you will select cash account or bank account some times company has different
two banks accounts so in this option you will change account.
Cash
amount balance: Here you will check your cash in hand
balance.
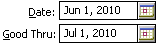
Date:
Here you will first change the date and type the date on which you receive
payment from customer,
Receipt
number: Here you will select receipts number.
Receipts
Amount: The amount which you received against sale is
written in this box.
Payment
method: You can change method for example may select credit card
option.
Apply
to revenue:
Here you will write the amount of sale which you
sale without issue of sale invoice for example extra unit for sale which not
included in invoice of particular customer.
Step
4:
 Apply
to sale invoice:
Apply
to sale invoice:
First you will select you customer from customer ID
then apply to sale invoice will edit able now you can record sales against sale
invoice.
Step
5:
Here
you will types information in related box and click on pay option.